
- Joined
- Feb 22, 2019
- Messages
- 116
- Reaction score
- 59
Hopefully this will assist people that want to mount an FPVLR, Whip, panel or amplified antenna. It may also dissuade some who have been thinking of it. It really is not that difficult to do but affords the chance to
screw up your controller if one is not careful.
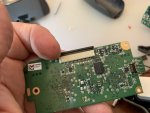
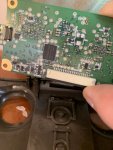
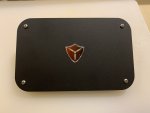
I ordered the Titan 2.4 panel kit. Unfortunately the interconnects between the panel and controller were left out of the box. Fortunately I had paid $15 extra for the whip antennas too so can fly with those while I wait for the interconnects. The internal cable swapping did not require soldering but was way more involved than I had dreamed, and required completely disassembling the Skycontroller, which I slowly figured out how to do. There is one possible shortcut I will point out that MIGHT work.
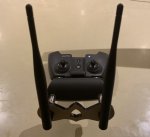
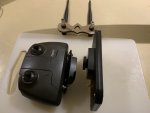
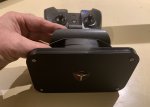
Also I have not mounted the optional t-mount for the panel as the end of the Anafi controller has an ever slo slight curve, combined with thwo screwheads on the back of the t-mount, this keeps the mount away from the conroller case enough that the threads on the connections are not exposed and the nuts cannot be secured in place. I have a plan for that and will attach the t-plate when the interconnects arrive. This will allow swapping the panel antenna to my other drone as I have two t-mount plates. This mount also allows upgrade to the amplifier in the future if desired.
NOTE. The cables that come with the Titan kit may be too short as there is no Anafi kit. I ordered 12” cables elsewhere that are way too long. The ones that came with the kit might or might not work. If one wanted to slice off the stock antenna and solder/splice onto them that would work, but that joint would not be shielded etc unless one covered up with shielding. Anyway I wanted a clean install. So here goes.
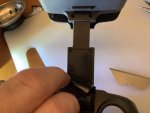
Mark your holes on the phone holder and with a drill bit manually start a hole so the pilot bit will not skitter all over the place. Save drilling the holes for when the arm is disassembled so you do not push the drill bit into the stock antenna cavity and wreak havoc.
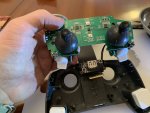
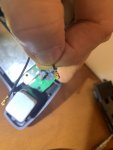
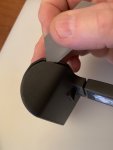
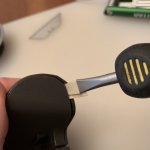
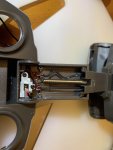
Start with a fine edged implement of your choosing to pry the two armature castings apart, then using a taped up flat screwdriver firmly and slowly work along the seam popping it apart as you go.
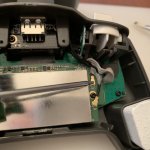
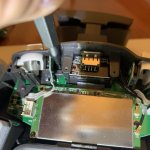
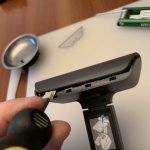
The on the other side of the phone holder look at the diagram sticker showing how to use the phone holder, and then peel back the rubber pad
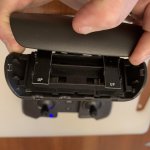
underneath, exposing four screws and remove them. Now pull off the plastic plate and curved end piece that pushes on and activates the power off tab when one closes up the controller. You can see the cables routed down the slide arm.
screw up your controller if one is not careful.
I ordered the Titan 2.4 panel kit. Unfortunately the interconnects between the panel and controller were left out of the box. Fortunately I had paid $15 extra for the whip antennas too so can fly with those while I wait for the interconnects. The internal cable swapping did not require soldering but was way more involved than I had dreamed, and required completely disassembling the Skycontroller, which I slowly figured out how to do. There is one possible shortcut I will point out that MIGHT work.
Also I have not mounted the optional t-mount for the panel as the end of the Anafi controller has an ever slo slight curve, combined with thwo screwheads on the back of the t-mount, this keeps the mount away from the conroller case enough that the threads on the connections are not exposed and the nuts cannot be secured in place. I have a plan for that and will attach the t-plate when the interconnects arrive. This will allow swapping the panel antenna to my other drone as I have two t-mount plates. This mount also allows upgrade to the amplifier in the future if desired.
NOTE. The cables that come with the Titan kit may be too short as there is no Anafi kit. I ordered 12” cables elsewhere that are way too long. The ones that came with the kit might or might not work. If one wanted to slice off the stock antenna and solder/splice onto them that would work, but that joint would not be shielded etc unless one covered up with shielding. Anyway I wanted a clean install. So here goes.
Mark your holes on the phone holder and with a drill bit manually start a hole so the pilot bit will not skitter all over the place. Save drilling the holes for when the arm is disassembled so you do not push the drill bit into the stock antenna cavity and wreak havoc.
Start with a fine edged implement of your choosing to pry the two armature castings apart, then using a taped up flat screwdriver firmly and slowly work along the seam popping it apart as you go.
The on the other side of the phone holder look at the diagram sticker showing how to use the phone holder, and then peel back the rubber pad
underneath, exposing four screws and remove them. Now pull off the plastic plate and curved end piece that pushes on and activates the power off tab when one closes up the controller. You can see the cables routed down the slide arm.
Attachments
-
 5C6F72F8-5AD9-4EEC-908E-F1BC3A7778AF.jpeg822.4 KB · Views: 136
 -
 DD85FB69-3BCD-4AE9-8F99-68F0876B4BFC.jpeg1 MB · Views: 125
 -
 0F8F83B1-4079-4090-9350-3F1947541C32.jpeg1.2 MB · Views: 126
 -
 2AA5EB76-BEB5-46FA-B483-DD23640B5A2B.jpeg1.6 MB · Views: 134
 -
 CFE5DD68-627A-426E-923A-88CA3DBCB632.jpeg1.1 MB · Views: 139
 -
 23638C90-BA7F-419C-95E4-0AE83B4B025D.jpeg2.2 MB · Views: 138
 -
 A833E28C-E60D-45AA-B055-140D75CE685B.jpeg1.4 MB · Views: 142
Last edited: