Welcome to our Community
Wanting to join the rest of our members? Feel free to sign up today.
Sign up

Simple Sunrise Panorama

Krusty Geeza

Well-known member
Joined
Dec 31, 2018
Messages
733
Reaction score
413
Location
Adelaide, South Australia
Website
alexmausolf.com
Using the DNG capture feature with manual exposure of shutter speed, ISO, white balance & then AE Lock is applied. I tried this as 7 Bracketed Captures, so as to give a +/- 3 stop difference of light to work with, but actually found that, as happens with my DSLR, I only actually needed to go +/- 2 stops, for a good starting point to editing. That is, I used 3 exposures for each HDR merge, the -2, 0 & +2 stop exposures. I merge the images as HDR's first, with lens fixes applied, then combine that to make the panorama. It's an extra step in Lightroom Classic, but worth it as it gives you ghosting control that otherwise isn't applied if you fully automate Lightroom Classic's HDR Panorama's. I also choose to crop it afterwards, so I have final choice of where that happens.

I have a very old iMac, mid 2011 actually & it takes about a minute to do each of the HDR merges, then about 2 minutes for the panoramic merge at the end.

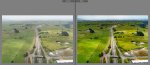
Anyway, here's what I came up with for a sunrise panoramic shot of the local community centre where I volunteer.

What I found interesting is that the exif says it was automated, when it wasn't! The 7 bracketed exposures were automated, but the control of exposure, ISO & light balance was manually chosen. The ISO was actually 160, but it says 131 in the exif data below!

  • Exposure Mode: Auto exposure
  • Exposure Program: Normal program
  • Exposure Time: 1/60
  • Photographic Sensitivity (ISO): 131
  • Light Source: unknown
  • Saturation: Normal
  • SensitivityType: ISO speed
  • Sharpness: Normal
  • Shutter Speed Value: 1/60
P0050006-HDR-Pano.jpg
 
Last edited:
Cheers Alex - worth a play.
I love Lightroom... I regularly shoot 350 aerial photos from the plane and the LR workflow is great... but I get comfortable (lazy) so your post is perfect!
I finally made a filter for applying the Anafi lens profile, some clarity etc on importing.
 
  • Like
Reactions: Krusty Geeza
Cheers Alex - worth a play.
I love Lightroom... I regularly shoot 350 aerial photos from the plane and the LR workflow is great... but I get comfortable (lazy) so your post is perfect!
I finally made a filter for applying the Anafi lens profile, some clarity etc on importing.

Thanks, Pete. I've gotta get some video footage of the place in daylight too, so as to show off some of the recent additions to the place thanks to some community development grants. That sort of thing incorporated within grant reports (& applications) goes a long way.

I have some photography acquaintances that bang on about using Photoshop all the time. There's no need for probably 99% of what I photograph! Landscapes, long exposures, architecture, macro & now aerial, can all be treated really well in Lightroom Classic.

Gotta love the work-flow, from import to export, the way you can apply things in bulk to heaps of images really speeds up the processing & I love the use of tagging, keywords, ratings, etc... so it's easy to find stuff years later. I have 4 different colour profiles for the Anafi so far, but they were created using a tiny pocket sized ColorChecker chart which I then cropped in on to create the profiles. A giant sized one should be here on my doorstep this week from the tracking of it. I'll redo them then & share the finished profiles here. Eventually I will take the time to use the Adobe Lens Profile kit & create a lens profile for the Anafi too.

The use of an import filter is smart! I do that for everything I take. It speeds things up exponentially by getting you off & running immediately!
 
  • Like
Reactions: MustangPhil
Hi Alex,

I’m really interested in your Anafi color profiles correction files made with a color checker chart (I only use a WhiBal gray card during the shooting).

I was wondering if anybody was producing take-off/landing pads made for drones that would be ‘pure grey’ instead of yellow fluorescent colors in terms of RVB content (with a thin cross-target sign for GPS positioning alignment and help the stitching of panos).

The problem with my grey card is the 3 cm x 6 cm (credit card) size, that is perfect for portraits... but as long as you take-off... it makes it complicated to ‘peek the tiny grey card’ for the white balance, and taking a picture of the grey card when the Anafi is just 50 cm above the ground does not give the sensor a proper view of the color of the whole scenery.
 
  • Like
Reactions: Krusty Geeza
Hi Alex,

I’m really interested in your Anafi color profiles correction files made with a color checker chart (I only use a WhiBal gray card during the shooting).

I was wondering if anybody was producing take-off/landing pads made for drones that would be ‘pure grey’ instead of yellow fluorescent colors in terms of RVB content (with a thin cross-target sign for GPS positioning alignment and help the stitching of panos).

The problem with my grey card is the 3 cm x 6 cm (credit card) size, that is perfect for portraits... but as long as you take-off... it makes it complicated to ‘peek the tiny grey card’ for the white balance, and taking a picture of the grey card when the Anafi is just 50 cm above the ground does not give the sensor a proper view of the color of the whole scenery.
I'll share the new colour profiles here once the new much larger ColorChecker plate arrives & I manage to capture frames under various light sources.

There are cheap 30 cm (12") fold-out grey cards available like this one, which would be perfect as drone pads for the tiny Anafi, but you'd want to be good at landing accurately. They fold up to a tiny thing in a small pouch about 12 cm across, so are easy to carry & the reverse side is pure white.

51M0vZuT-QL._SL1001_.jpg
 
  • Like
Reactions: MustangPhil
Thanks Alex for this info. I had already found this kind of foldable grey mat, but the critics are not very good (un-precise, variations of colors depending on where you peek on the tissue, ‘foldings’ marks on the tissue that make dark lines, reflexions...).
Plus I fear that if I lay this thin layer of fabric on a wet ground (grass or mud)... it would end up being useless.
I may try to build one out of grey PVC thin sheets, but I have to find a ‘really grey one’ ;o)
 
  • Like
Reactions: Krusty Geeza
Thanks Alex for this info. I had already found this kind of foldable grey mat, but the critics are not very good (un-precise, variations of colors depending on where you peek on the tissue, ‘foldings’ marks on the tissue that make dark lines, reflexions...).
Plus I fear that if I lay this thin layer of fabric on a wet ground (grass or mud)... it would end up being useless.
I may try to build one out of grey PVC thin sheets, but I have to find a ‘really grey one’ ;o)
I have one of these & it's uniform at 18% grey, but it was purchased through a photography store in-person. Maybe there are lesser quality knock-off's? I didn't think about mud or the wet! That would kill it, for sure!

I'm sure if you searched long & hard you would find 18% grey material with which you could make something, Phil. You could always purchase a cheap larger light bouncer that also folds up like the above one, remove its material & put yours in its place, of course with adequately waterproof backing to the underside for your European climate.
 
I use the WhiBal as a target in post.

I have noticed that all of my images do not show the "camera" in the exit data.
So used to it automatically showing up in my uploads go Flickr with my DSLR's
Wonder if there is a way for Parrot to enable this feature ?
 
  • Like
Reactions: Krusty Geeza
I use the WhiBal as a target in post.

I have noticed that all of my images do not show the "camera" in the exit data.
So used to it automatically showing up in my uploads go Flickr with my DSLR's
Wonder if there is a way for Parrot to enable this feature ?
The largest sized WhiBal would work reliably for us, as the others I feel would be too small within the frame to be effective.

I like the ColorChecker cards because not only do they correct white balance, but they also correct colour balance through the colour chips, when used in conjunction with a Lightroom add-on that's free to download from the X-Rite site.

I am sure that there is a way for the Anafi to be recognised as the lens, Lightroom already recognises the Anafi lens when I select "Parrot" as the lens maker.
 
Photoshop CC recognizes the Anafi as well,but "Anafi" is not written.into the EXIF/ Meatadata.
I think this is a software issue on Parrot's end.
 
  • Like
Reactions: Krusty Geeza
Photoshop CC recognizes the Anafi as well,but "Anafi" is not written.into the EXIF/ Meatadata.
I think this is a software issue on Parrot's end.
Have you ever seen LensTagger? It allows you to do this in Lightroom manually. I use it for my tilt-shift lens, an old macro lens & an old telephoto lens that I have. I haven't set it up for the Anafi yet, but will do today.
 
  • Like
Reactions: ARebok and Thanev

New Posts

Members online

No members online now.

Forum statistics

Threads
5,295
Messages
45,051
Members
7,965
Latest member
Peanut