Welcome to our Community
Wanting to join the rest of our members? Feel free to sign up today.
Sign up

SkyShit Booster mods for BB2 any good?

Hello,

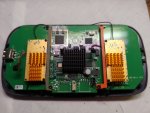
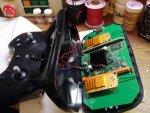
Sorry to hear you’re having issues with the Solaris Bebop mod, if it’s getting hot and the mod has created other problems most likely it’s one or several U.FL antenna connections not correctly applied.

This happened to me on my first Solaris mod kit, it’s very easy to incorrectly cut a trace line or incorrectly solder on a U.FL antenna connector.

Retrace all work, test each solder with a meter. I’ve installed around 5 of these Solaris mod kits, first one is the toughest.

Keep us posted,
Paul
 
Mine is power edition. So I didn’t have to cut an trace. The ufl connectors are allready on. He show u an tells u in his video. I really have. Promblem with no gps on my remote. An what kind of clover leaf Atenna to upgrade to the drone 2.4 or 5.8 or 5. For video An 2.4 for remote. Or DOENT matter. Stick are dual band.
 
Hello Breau,

That’s great you are using the power 2 controller with built in .UFL. Connectors, this simplfles the mod much easier to work with and narrows down issues.

I have two power 2 controllers with the Solaris mod kits, they auctually have more performance over original Skycontroller 2 with same mod. Only down fall is the small cylinder 3.6 volt battery’s life is shorten running two booster amplifiers, but for now let’s get you going and we’ll worry about the battery later. We can modify your controller battery setup another time.

If I’m reading this right, you went with the clover type antenna on the Bebop 2? If you did replace the antenna, remove the clover antenna and use original antennas. Recheck antenna connections, this may be the GPS issue you’re experiencing.

For now, switch back to the original antennas. Let’s go from there, we’ll figure this out and get your Solaris modded Bebop 2 up in the air. Another helpful tip, always disconnect Bebop 2 battery from drone after flight is over. And only connect to Bebop 2 drone when you are going to fly or for testing purposes, the way the booster amplifier is wired to Bebop 2 drone it’s always drawing current. You probably already know this, it’s not mentioned on the mod kit instructions.

Have patience, we’ll get your Solaris mod kit working.

Paul
 
Last edited:
Sorry for the confusion. My grammar sucks aswell.
I WANT TO ADD a clover leaf to my drone that is boosted. Since kit only boost one antenna. I HAVE GPS WITH MY DRONE.

I DONT HAVE GPS WITH MY REMOTE I WILL TAKE A PIC WHEN I GET HOME OR VID AN SHOW AN EXplain.

But since I did the mod I don’t have gps on my remote. It will still return to home if I ask it to or loose signal. I still have all maps.

The other day it wouldn’t do follow me aswell said no gps on remote. Everything else is fine.

I want to upgrade all my antenna’s is my goal An to fix my remote gps.

So the mod will be pushing a polarized circular half phere one on one side to get that 60 degree beam an I’m going to put a helix directional on the other side of the remote. For line sight extra range. Witch will be boosted by the mod on my remote.

I’m not sure bout how the antennas work on the drone I understand that they are dual band. An switch signals an witch one to use. What type of clover leaf do I need 2.4 or 5. Or are then dual as well. I want to replace both on the drone even the one not boosted. I understand the all have to be the same way. As in left an right handed antenna.

I’m self taught an trying to learn more an make my own mods an Theories. Just need little more knowledge bout how the drone antennas an the difffernt band how they talk. Witch one use for what like tx an then the other one is rx I think.
Anyway thanks for all ya help bro. Any insight he great.
I also found a 4g lte phone signal uva set with like 40km range an no line of sight nod for 40 Bucks. They sell one for like 400 an one with the disco for 1800. But I found way to set it up for 40 bucks
 
Ok so my question is do all my atennas need To be one band 2.4 or 5.8 or can u have both on remote an drone. I need an explanation of that.

The first pic is the antenna’s I’m putting on remote that is boosted.

The second is Witch is what I want to putt on the DRONE. Two of them even the not boosted.
WITCH ones do I need both 2.4 or 5.8 or can it be one of each.
 

Attachments

  • 84C77853-CADC-46DE-B6EF-21F4A861D36A.png
    84C77853-CADC-46DE-B6EF-21F4A861D36A.png
    2.3 MB · Views: 16
Ok so my question is do all my atennas need To be one band 2.4 or 5.8 or can u have both on remote an drone. I need an explanation of that.

The first pic is the antenna’s I’m putting on remote that is boosted.

The second is Witch is what I want to putt on the DRONE. Two of them even the not boosted.
WITCH ones do I need both 2.4 or 5.8 or can it be one of each.
I’m not sure which of these antennas from your picture to use on Bebop 2, maybe someone here will know and give their opinion. I do have two of those same antennas from FPVLR, bought them last year. I’ll experiment and try one with my Bebop 2, They are 2.4.

I think for now, don’t worry about replacing bebop 2 antennas and focus on fixing the GPS issue with your Skycontroller 2. That’s more important at the moment, you may loose your Bebop 2 on a fly away if it disconnects at a great distant, I know you said it’s returning after a disconnect but don’t risk it until you fix the controller GPS issue.

Since you’re using the Black Power Skycontroller 2 cylinder battery version type, these are priced very low on eBay. You may need to purchase another and transfer the mod kit over to the replacement Skycontroller to eliminate the GPS issue.

I’ll keep you posted how the FPVLR antenna works with one of my booster Bebop 2.

Thanks for bringing it up, luckily I have two of these antennas.

All the best,
Paul
 
Hi,battery consumption is minimal,booster is connected directly to the power/board thus small switch so booster wouldnt run when skycontroller is off,
Dont forget,if your booster is off ,your signal going trough dead booster will not be strong as before when you didnt have any booster.....due interferance he got rid of fan and added heat sinks to boosters thus heat problem was solved....What I believe to be 3W boosters are “factory calibrated”(that dude has some connections and some really expansive equipment) down to aprox.1.7W(not gonna find that anywhere) and properly calibrated to give you max .signal strenght.....to get it to work really good you need bebop booster and skycontroller booster,he sells it as a kit......its a difficult installation for someone without any soldering experience,i have lots of experience so installing bebop booster took 1 hour(mostly taking bebop completly appart) and skycontroller took few days because i wanted it done my way......from what i can tell bebop booster helps a lot with interferance and sky booster gives you some serious range(compared to flying without booster).....i flew bebop with different boosters,sc1 with different boosters and sc2 with different booster and i can say mod made by solaris is the best booster mod for bebop out there
Here is pic of my skycontroller,addd voltage meter,extra booster light for power and signal and added led power button for a booster
Could you send me a link for the power button you used, I like the clean look it provides. I'm worried I'll order one that may not clear the inside
 
Hi,battery consumption is minimal,booster is connected directly to the power/board thus small switch so booster wouldnt run when skycontroller is off,
Dont forget,if your booster is off ,your signal going trough dead booster will not be strong as before when you didnt have any booster.....due interferance he got rid of fan and added heat sinks to boosters thus heat problem was solved....What I believe to be 3W boosters are “factory calibrated”(that dude has some connections and some really expansive equipment) down to aprox.1.7W(not gonna find that anywhere) and properly calibrated to give you max .signal strenght.....to get it to work really good you need bebop booster and skycontroller booster,he sells it as a kit......its a difficult installation for someone without any soldering experience,i have lots of experience so installing bebop booster took 1 hour(mostly taking bebop completly appart) and skycontroller took few days because i wanted it done my way......from what i can tell bebop booster helps a lot with interferance and sky booster gives you some serious range(compared to flying without booster).....i flew bebop with different boosters,sc1 with different boosters and sc2 with different booster and i can say mod made by solaris is the best booster mod for bebop out there
Here is pic of my skycontroller,addd voltage meter,extra booster light for power and signal and added led power button for a booster
Thats a great look with the button instead of a switch. I really want to get his modkit but need a better "how to" than his. Are you aware of any better documented instructions for the mod?
 
Thats a great look with the button instead of a switch. I really want to get his modkit but need a better "how to" than his. Are you aware of any better documented instructions for the mod?
I’ve installed many of these Solaris mod kits onto each SkyController 2 version, if you do order one of these mod kits I’ll gladly help you.

This particular Mod kit are not expensive, well worth the small investment. Definitely increase signal strength, and increase range in areas with inference or obstacles. Plus, Improve video feed. That’s one of the noticeable improvements of this mod, video feed on phone is much clearer more detail.

Highly recommend the Bebop 2 mod kit, he’s improved the latest version 2020-mid.

As far as better instructions, yes for the first time-mod builder it can be a challenging mod. If you do order one, keep in touch I’ll gladly be there to help out.

Paul

Good luck,
Paul
 
Thats a great look with the button instead of a switch. I really want to get his modkit but need a better "how to" than his. Are you aware of any better documented instructions for the mod?
It took me some time to find right size and voltage push button,there is type that latches when you press and type that doesnt latch and you have to hold button preesed all the time to power sc2,also you need right size resistor,without it it will burn out power button...i spent more time on reading about power buttons and resistors and installing **** button than installing whole booster Kit...in my opinion it is not worth it,i wouldnt do it second time ...
button:

resistor:
 
I just purchased this booster kit for my Bebop 2. Its not working as expected, I think something is not right with the install on the drone side. Have to work on it.

Mike


Thanks
Keep us posted, if possible post pictures of mod. Mini module, areas positive/negative leads soldered too etc.

If all fails, you still can’t get the mod going I’ll go over your work (both controller and drone) and mail it back to you properly put together if you missed anything.

Good luck,
Paul
 
I think the issue is on the drone side. I am seeing improvement somewhat with some test flights, but not what it can do. Since I use an Android device, the Wifi reading is not a number but a symbol for signal.

When the drone loses signal, the flight data shows the Wifi signal is still good.

This was a test, I flew in the same area and it did fly further, but not as good as it should. I am thinking something is loose or not connected right in the drone. Been busy lately, hope to look into it this week.


Attachments

  • 2020-8-26 4-41-6.jpg
    2020-8-26 4-41-6.jpg
    158.2 KB · Views: 7
  • 0825201743 (Medium).jpg
    0825201743 (Medium).jpg
    175.5 KB · Views: 8
  • 0826201810 (Medium).jpg
    0826201810 (Medium).jpg
    166.9 KB · Views: 12
  • 0826201828 (Medium).jpg
    0826201828 (Medium).jpg
    211.3 KB · Views: 10
  • 0826201918 (Medium).jpg
    0826201918 (Medium).jpg
    199.8 KB · Views: 8
  • 0826201834a (Medium).jpg
    0826201834a (Medium).jpg
    144.5 KB · Views: 6
  • 0826201919_HDR (Medium).jpg
    0826201919_HDR (Medium).jpg
    201.1 KB · Views: 8
  • 0827201855a (Medium).jpg
    0827201855a (Medium).jpg
    175.9 KB · Views: 8
Terrific job on the mod, yeah looks like everything is completed correctly.

I noticed the controller has the module lights like the older version mod, did you add these on. I ask, because the newer version amplifiers don't used these lights anymore and have a mini light on the amplifier board instead.

Plus, Excellent work cutting the trace four leads on the board. Not doing this will damage the controller circuitry when turning on amplifiers, that was the case with someone I bought a used mod kit from. He didn’t cut these trace leads and when he powered up the amplifiers it damaged the controller circuitry.

With this new updated 2020-mid Solaris mod kit, I’m taping two holes on top of controller antenna setup to view the red lights from the amplifiers, this assures me they are working.

On the amplifier for Bebop 2 camera, you can actually see the red glow from the mini red light through the camera nose cover when it’s on. Here are some pictures, I mount the camera amplifier upside down so the cable connecting to circuit board has more slack, the opposite cable connects to antenna foot. The nose cover is off to show which cables connect to board and antenna footI

Hopefully others will order a mod kit from Solaris for bebop 2, Solaris bebop 2 mod kits definitely improve signal for low level flying or longer distances in areas with inference or obstacles. Hats off to Solaris, providing us powerful mods.

Copied a picture from your post and circled the trace cut you made and posted it below, good job!

Thanks for sharing!
Paul 5098E4A2-E82F-4C30-A3E6-5A7A7EE6B21E.jpegCD05B466-2AF7-49EE-BB88-1CE95F97600A.jpeg7752F461-EA36-480A-A593-C20014323BDA.jpeg9A81E499-5FBC-4E68-8B20-1733F61C4E06.jpeg8AD99FB2-62E1-4807-852E-AF130B726E11.jpeg
 
Last edited:
Another test over a building I have flown several times to document its demolition.

Looking at your wifi signal in this video i dont see any issues,i think you got it this time
Edit:here is video of my boosted bebop 2,you can compare wifi signal strenght,very similar.
 
Last edited:
Terrific job on the mod, yeah looks like everything is completed correctly.

I noticed the controller has the module lights like the older version mod, did you add these on. I ask, because the newer version amplifiers don't used these lights anymore and have a mini light on the amplifier board instead.

Plus, Excellent work cutting the trace four leads on the board. Not doing this will damage the controller circuitry when turning on amplifiers, that was the case with someone I bought a used mod kit from. He didn’t cut these trace leads and when he powered up the amplifiers it damaged the controller circuitry.

With this new updated 2020-mid Solaris mod kit, I’m taping two holes on top of controller antenna setup to view the red lights from the amplifiers, this assures me they are working.

On the amplifier for Bebop 2 camera, you can actually see the red glow from the mini red light through the camera nose cover when it’s on. Here are some pictures, I mount the camera amplifier upside down so the cable connecting to circuit board has more slack, the opposite cable connects to antenna foot. The nose cover is off to show which cables connect to board and antenna footI

Hopefully others will order a mod kit from Solaris for bebop 2, Solaris bebop 2 mod kits definitely improve signal for low level flying or longer distances in areas with inference or obstacles. Hats off to Solaris, providing us powerful mods.

Copied a picture from your post and circled the trace cut you made and posted it below, good job!

Thanks for sharing!
Paul View attachment 4749
i drilled holes in same location for a purpose of venting antenna compartment,it gets really hot when is warm and sunny outside,i drilled 2 on the top and 2 on the bottom and when i place my hand next to holes i can really feel hot air coming out of holes
 

Attachments

  • 35C72BE1-3BCF-4C78-81D3-938167BA0035.jpeg
    35C72BE1-3BCF-4C78-81D3-938167BA0035.jpeg
    1.5 MB · Views: 4
  • 17813D70-3DC3-41AE-9FF9-CBEE1FD2EE3D.jpeg
    17813D70-3DC3-41AE-9FF9-CBEE1FD2EE3D.jpeg
    1.5 MB · Views: 4
Terrific job on the mod, yeah looks like everything is completed correctly.

I noticed the controller has the module lights like the older version mod, did you add these on. I ask, because the newer version amplifiers don't used these lights anymore and have a mini light on the amplifier board instead.

Plus, Excellent work cutting the trace four leads on the board. Not doing this will damage the controller circuitry when turning on amplifiers, that was the case with someone I bought a used mod kit from. He didn’t cut these trace leads and when he powered up the amplifiers it damaged the controller circuitry.

With this new updated 2020-mid Solaris mod kit, I’m taping two holes on top of controller antenna setup to view the red lights from the amplifiers, this assures me they are working.

On the amplifier for Bebop 2 camera, you can actually see the red glow from the mini red light through the camera nose cover when it’s on. Here are some pictures, I mount the camera amplifier upside down so the cable connecting to circuit board has more slack, the opposite cable connects to antenna foot. The nose cover is off to show which cables connect to board and antenna footI

Fantastic job! Hopefully others will order a mod kit from Solaris for bebop 2, definitely improves signal for low level flying or longer distances in areas with inference or obstacles.

Currently have three working SkyController 2 each with Solaris mod kits, two current 2020-mid and one of the earlier versions with amplifier lights outside of amplifiers.

I copied a picture and circled your trace cut and posted it below, good job!

Thanks for sharing!
Paul View attachment 4745View attachment 4746yView attachment 4745View attachment 4746
i drilled holes in same location for a purpose of venting antenna compartment,it gets really hot when is warm and sunny outside,i drilled 2 on the top and 2 on the bottom and when i place my hand next to holes i can really feel hot air coming out of holes
Nice looking cooling setup for controller Skydreamer,

Noticed you're heavy involved with Solaris mods, that’s great same here. If you ever need backup Controller amplifiers, same as yours I’ve got several sets including a few bebop 2 camera amplifiers.

Don’t mind sharing what I have knowing you can complete the mod, always good having backups.

Paul
 

Attachments

  • 8057BA08-5777-4AEC-AE89-0E5695AB3DAC.jpeg
    8057BA08-5777-4AEC-AE89-0E5695AB3DAC.jpeg
    73.8 KB · Views: 1
  • Like
Reactions: Skydreamer
Terrific job on the mod, yeah looks like everything is completed correctly.

I noticed the controller has the module lights like the older version mod, did you add these on. I ask, because the newer version amplifiers don't used these lights anymore and have a mini light on the amplifier board instead.

Plus, Excellent work cutting the trace four leads on the board. Not doing this will damage the controller circuitry when turning on amplifiers, that was the case with someone I bought a used mod kit from. He didn’t cut these trace leads and when he powered up the amplifiers it damaged the controller circuitry.

With this new updated 2020-mid Solaris mod kit, I’m taping two holes on top of controller antenna setup to view the red lights from the amplifiers, this assures me they are working.

On the amplifier for Bebop 2 camera, you can actually see the red glow from the mini red light through the camera nose cover when it’s on. Here are some pictures, I mount the camera amplifier upside down so the cable connecting to circuit board has more slack, the opposite cable connects to antenna foot. The nose cover is off to show which cables connect to board and antenna footI

Hopefully others will order a mod kit from Solaris for bebop 2, Solaris bebop 2 mod kits definitely improve signal for low level flying or longer distances in areas with inference or obstacles. Hats off to Solaris, providing us powerful mods.

Copied a picture from your post and circled the trace cut you made and posted it below, good job!

Thanks for sharing!
Paul View attachment 4751View attachment 4752View attachment 4748View attachment 4749View attachment 4750

I added the Blue LED to indicate when the boosters are on in the skycontroller.

I sent the links to Drone Propulsion (where I bought the kit) and he agrees something is not right. It looks like its on the drone side. I don't see a LED light on the board on the Bebop 2 side so I am thinking something got knocked off when assembling. Only other thing i can think of is I connected the amplifier to the wrong connection that goes out to the foot, there are two of them.

I have been busy this week so I have not had time to look at it again. Going away camping the next few weekends so have to get ready for that.

Thankfully he included extra antenna connections, I ruined two of them soldering them on the board. It was a tricky solder job even with a small tip on my iron.

You are right, the controller does get warm with the boosters. I am thinking of drilling a few holes to vent the heat out as well.
 
I see,
I added the Blue LED to indicate when the boosters are on in the skycontroller.

I sent the links to Drone Propulsion (where I bought the kit) and he agrees something is not right. It looks like its on the drone side. I don't see a LED light on the board on the Bebop 2 side so I am thinking something got knocked off when assembling. Only other thing i can think of is I connected the amplifier to the wrong connection that goes out to the foot, there are two of them.

I have been busy this week so I have not had time to look at it again. Going away camping the next few weekends so have to get ready for that.

Thankfully he included extra antenna connections, I ruined two of them soldering them on the board. It was a tricky solder job even with a small tip on my iron.

You are right, the controller does get warm with the boosters. I am thinking of drilling a few holes to vent the heat out as well.
The new controller amplifiers are running cooler than original amplifiers, draw less amps prolonging controller battery life.

Good job on adding the blue LED lights onto the amplifiers, that’s a cool color. With the new 2020-mid amplifiers, the tiny LED amplifier lights are hidden inside controller, Drilled holes directly above both amplifier LED lights to visually confirm they’re on when powering on controller. I’m not done with the holes, going to enlarge them and use the provided rubber hole mounts Drone Propulsion provided but I won’t do this until I open the controller again.

With the bebop 2 amplifier on the drone side, yes mounting the cables on opposite sides may damage the drone amplifier when powering up. If the mini red LED isn’t glowing, something is definitely wrong. I would test those two leads running to drone amplifier first, making sure it’s getting voltage to amplifier when battery is connected. Could be the mini connectors between amplifier on drone side, that’s happened to me once the leads pushed into the amplifiers mini connectors were not pushed in far enough.

Hope you get this solved before your camping trip, good luck.

Paul

9E46DCF0-711E-4470-868B-2348C60EACFF.jpegF519E5D4-67E9-4B4E-866F-8CBBBF1ABAC9.jpeg
 

Members online

Forum statistics

Threads
5,295
Messages
45,059
Members
7,965
Latest member
Peanut